So, I’ve showcased what a designer can do with some flash cards, a gridded mat, and a whole bunch of documentation. Now it is time to show off a digital level that was designed and developed using the Unreal Development Kit (UDK). It is free to download here, in case you wanted to tinker with it a bit: http://www.unrealengine.com/udk/downloads/
This project, like the other, was conducted with other team members. I believe it included 4 weeks to create the game, but it may have only been 3. A bit of time has elapsed since then, and my memory is somewhat foggy regarding the details. I nominated not to include the documentation for this project, as all of what is typically required was covered in the post for the board game “Elixir”. This should cut down on the length for you readers. Don’t say I never did anything for ya! 😉

1st half of level
Now, you may be wondering to yourself, “Are those blue and gray checkers supposed to be a part of the level?” No, they are not. Sadly, the computer that houses some of the textures and other assets of the level is currently in the hospital. I will update this post with additional details about the level when I get a hold of those assets, but before I move onto the visual scripting bit, I will briefly describe how the level should look if everything was there.
The player, when starting the game, would start in the upper left-hand side of the image above. It would be the area shrouded behind all of the trees. That large patch of checkers in the center is actually supposed to have a running river going through it. Rocks were placed in the river, so that the player could jump across the river safely. If the player feel into the water, they would take damage to their health bar over time. The team’s texture guy did a fantastic job of making the running water and mist coming off of it. The numerous grassy platforms should contains various rocks and other foliage. These rocks wold also be used as platforms and cover to hide from malicious non-playable characters (NPCs).

2nd half of level
To reach the second section of the level, the player would cross the bridge that connects the two halves together. Once again, this is intended to be decorated with various rocks and plant life. The player must navigate through a catacomb of more rocks, defeating enemies on the way.
The large pagoda structure looked fantastic with all the textures and lights on it. This is the place the final boss was located in. We tried our best to make it visible throughout the course of the level, not only to convey the structure’s significance, but to maintain the player’s orientation while playing. If there is ever any confusion as to where they need to go, they only need to look for the large pagoda.
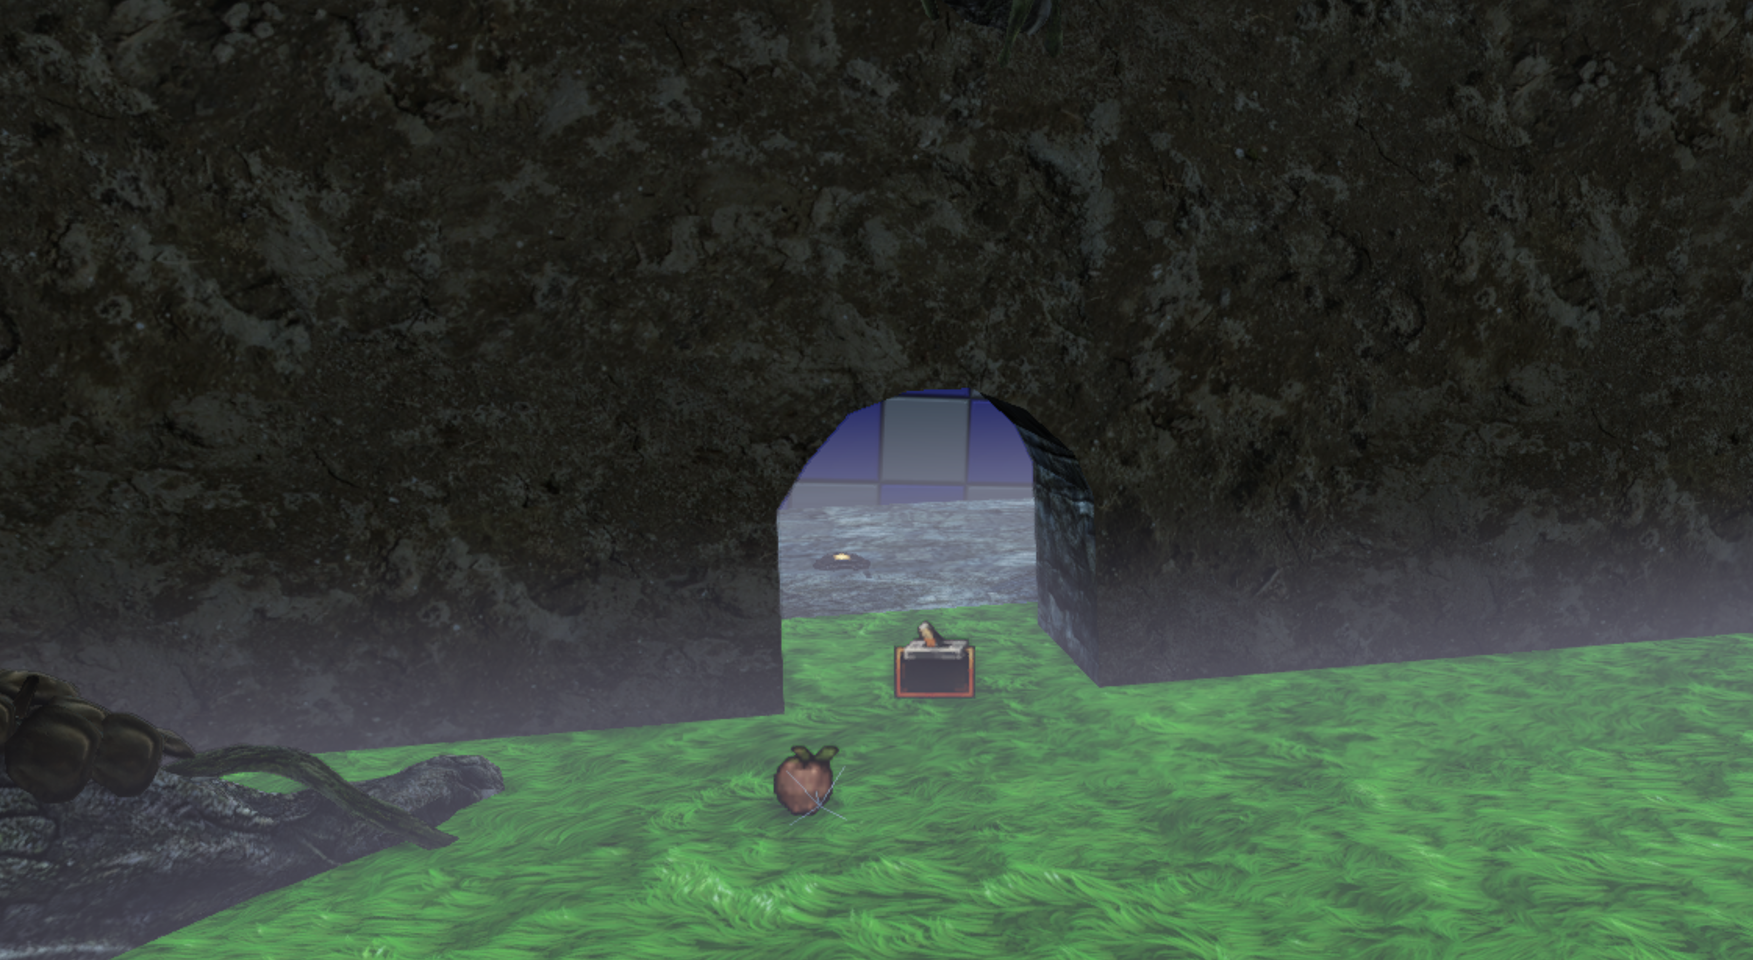
Cave Entrance: Originally had locked door that could only be opened by a key that is dropped by the “final boss”. Breaching the cave means the level is complete.
Once the player defeats the boss, a key static mesh would appear where it fell. The player need only to walk over the key to “pick it up”. Having this item is required to open the cave door (that would have been there, fully animated in the final version). Entering this cave and acquiring the final item signifies the end of the level.
Kismet Visual Scripting
All Kismet sequences governing events in the level
Kismet was my baby of the project, and I loved doing it. This is primarily because I am terrible at traditional scripting with code, and because, despite being a novice, I picked up visual scripting very quickly. This Kismet is very unorganized. Most of the time each type of sequence would be categorized (AI, Respawning/Checkpoints, Objective items, weapons, etc).

The blue named rectangles are examples of categorizing the kismet. The front page should be covered with these, rather than having sequences running around here and there. At least that is my practice these days.

Double-click on one of these categories will open up all the kismet sequences housed within
But, considering that this was my first major project with Kismet, you’ll have to forgive my sloppiness.
Let’s start by exploring the first thing I learned how to make work! We used and abused triggers, because they are one of the easiest and most accurate ways to trigger all sorts of events.

Ya know, these things.
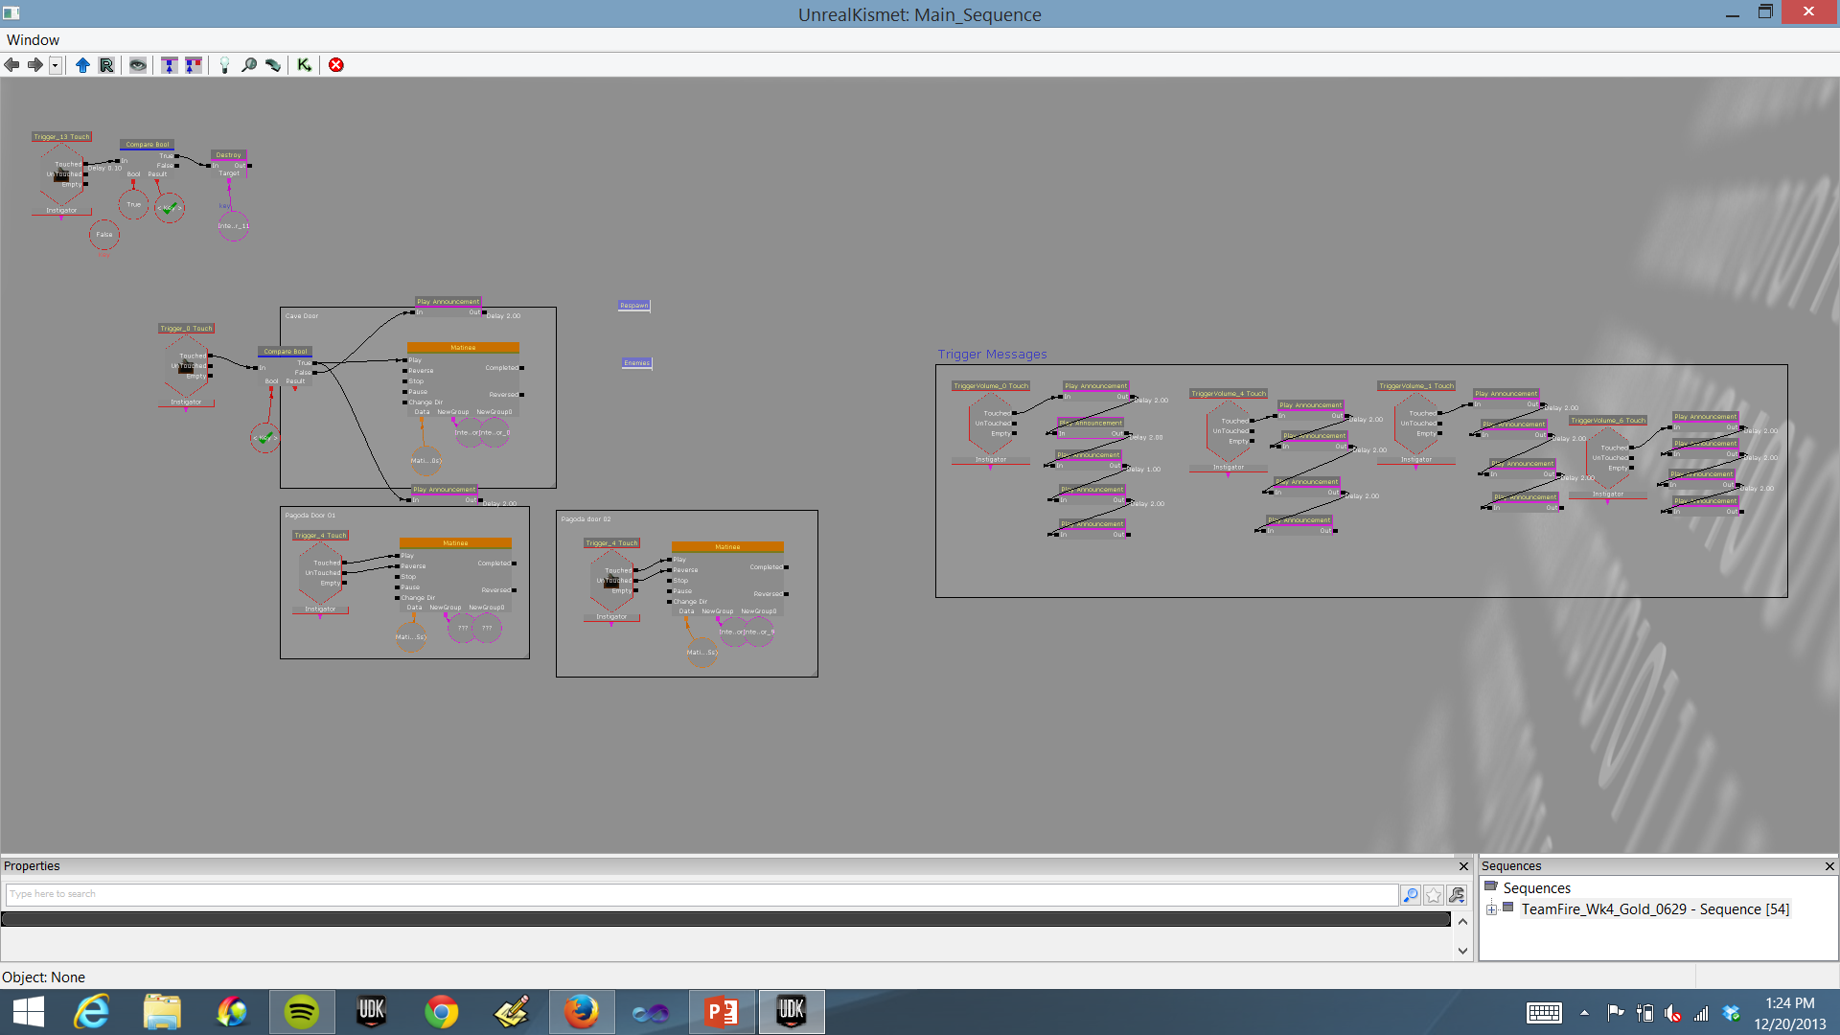
When the player enters the radius, which we can manually set, an event will occur. The image below, in ever day English, says that when the player touches a certain radius, a series of announcements will appear on the screen for the player to read. We included story narrative, instructions, or taunts from the enemy utilizing this method. It’s primitive, but it works.

Triggers and the associated announcements. Delay of two seconds means the player will have enough time to read the message before the next one appears.
Triggers can also be used to activate the animation of Interpolating Actors. These actors look a lot like static meshes, but are converted so that they can be animated. The “Matinee” node in Kismet is used to record this movement. It then plays back in the game. When the player leaves the trigger volume, the animation is set to reverse, so that the doors close.
By default, all triggers are set to activate once. When a player enters a trigger the action executes only once. If we had left this setting as is, and the player accidentally left the trigger volume, the doors would close and never open again, effectively locking the player out of the pagoda. Thus, in the settings of the trigger node, “Max trigger count” needed to be set to 0, which means the trigger would activate infinitely.

Triggers to govern the animation of the doors when the player touched the trigger
When the Matinee node is double-clicked, the UnrealMatinee opens in a new window. The timeline for how long the animation lasts can be altered by clicking and dragging the triangles at the bottom of the timeline. Keys, the triangles within the timeline, serve as breakpoints. In this instance, the doors remain closed at the first key. By the time the playback reaches the second key, the doors will be fully open. Animation is as simple as that!

UnrealMatinee governing the animation of one pagoda door
Setting Player Checkpoints
Next up is my pride and joy, setting up checkpoints that the player would respawn at in the event that the player avatar died.
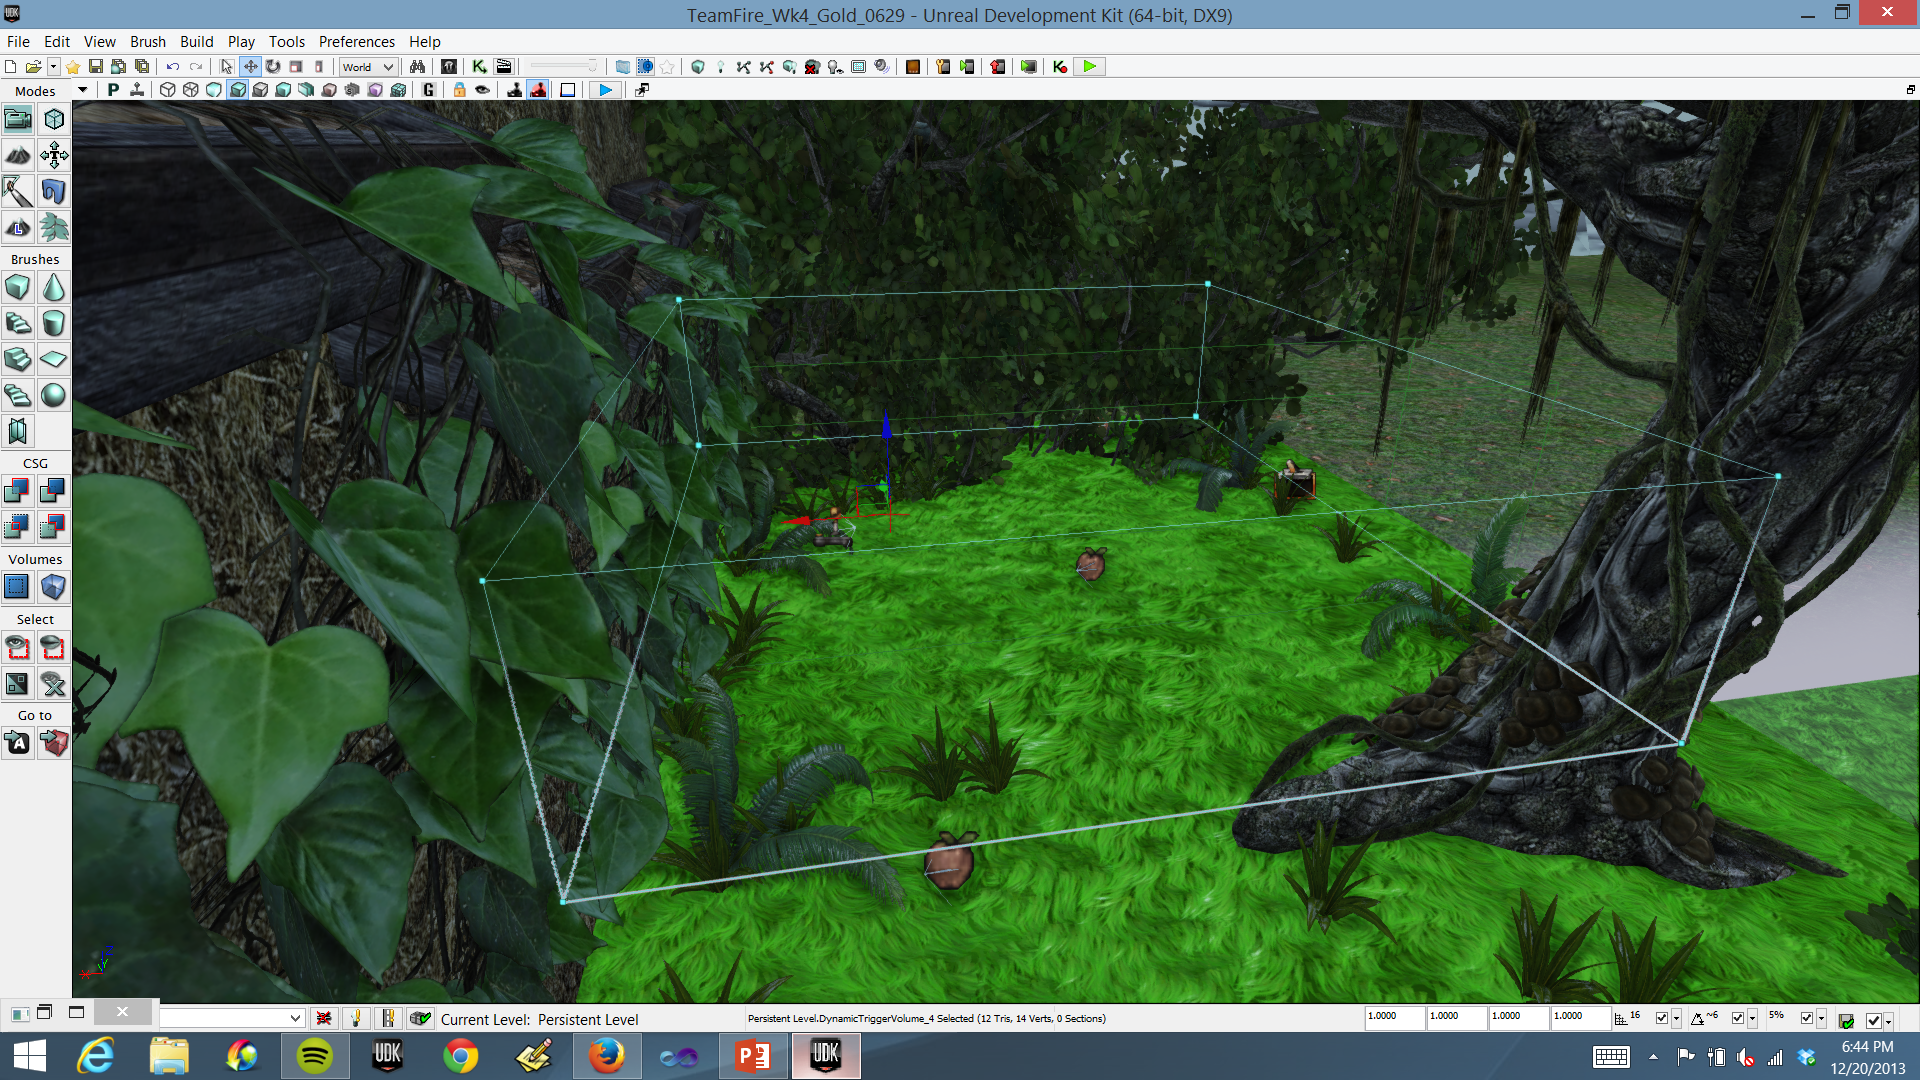
The process starts with placing a few of these Dynamic Trigger Volumes in (the big cyan colored rectangle)
A touch node for each of the trigger volumes is then linked to activating a nearby spawn location. This activating toggle node is then linked to another toggle node that turns the other spawn beacons off, so as to not respawn the player in an undesirable location. Each time the player enters a new Dynamic Trigger Volume, a new spawn location is activated, while the others are turned off once again. Tah-Dah! Checkpoints done.
Note: The “Player Spawned” sequence doesn’t govern respawning. It is there solely to check if the player avatar has the intended weapon at the time it is spawned. If it does not, it assigns a weapon through the “Give Inventory” node. The default spawn location (the first one placed in the map) is automatically set to “on”. As such, the player will spawn there if they die until that spawn region is toggled off through other means.

All Dynamic Trigger Volumes for the level, linked to a toggle node turning on the proper spawn location while turning the others off.
Artificial Intelligence
I still hold a grudge against scripting the Artificial Intelligence for this level. It kept me up many a night, trying to iron out pathing and properly engaging the player in combat properly. In the end, the scripting looked something like the hot mess depicted in the image below.
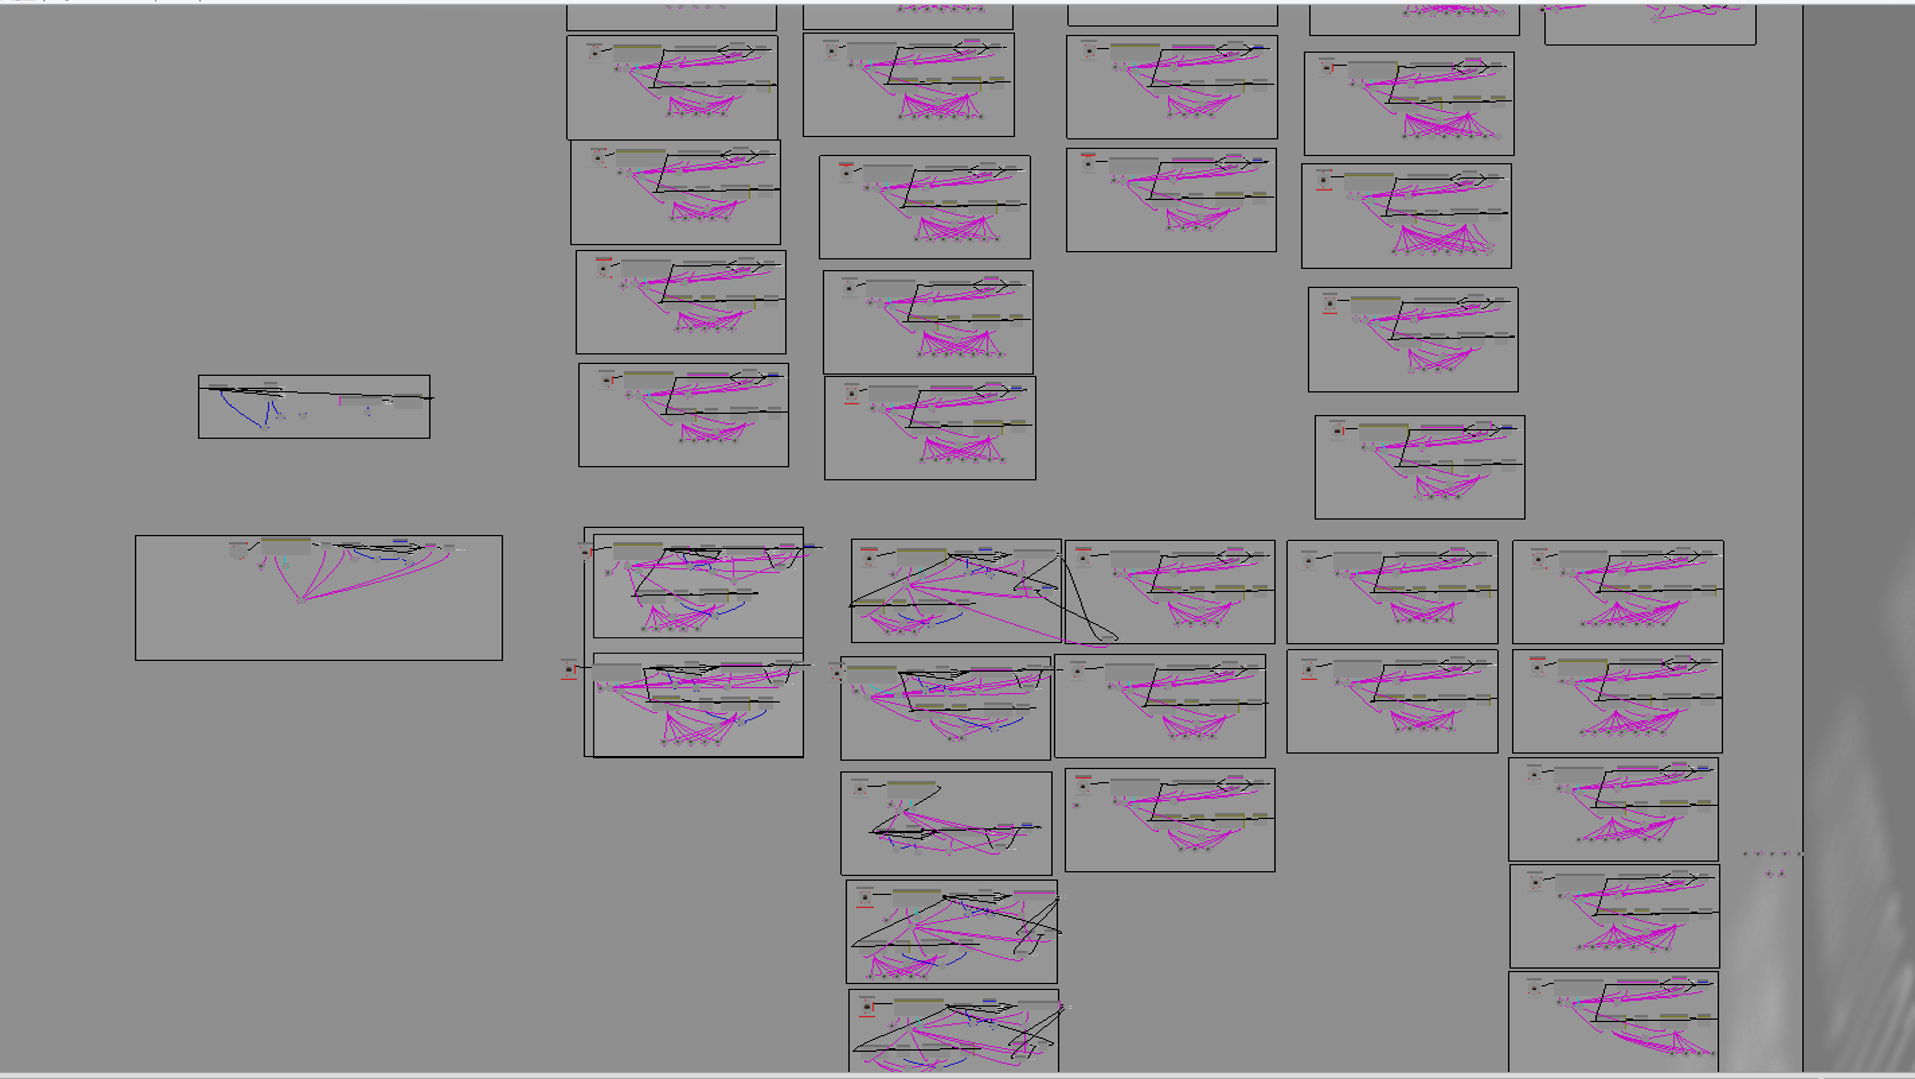
And that isn’t even all of it! Some of the sequences couldn’t fit on the screen.
Obviously, I cannot walk through each and every single instance of spawning, moving, and telling the AI when to engage the player. To do so would take ages, and would likely bore you, the reader. With that said, I will take one instance and walk through it. Most others follow the same school of thought anyhow.
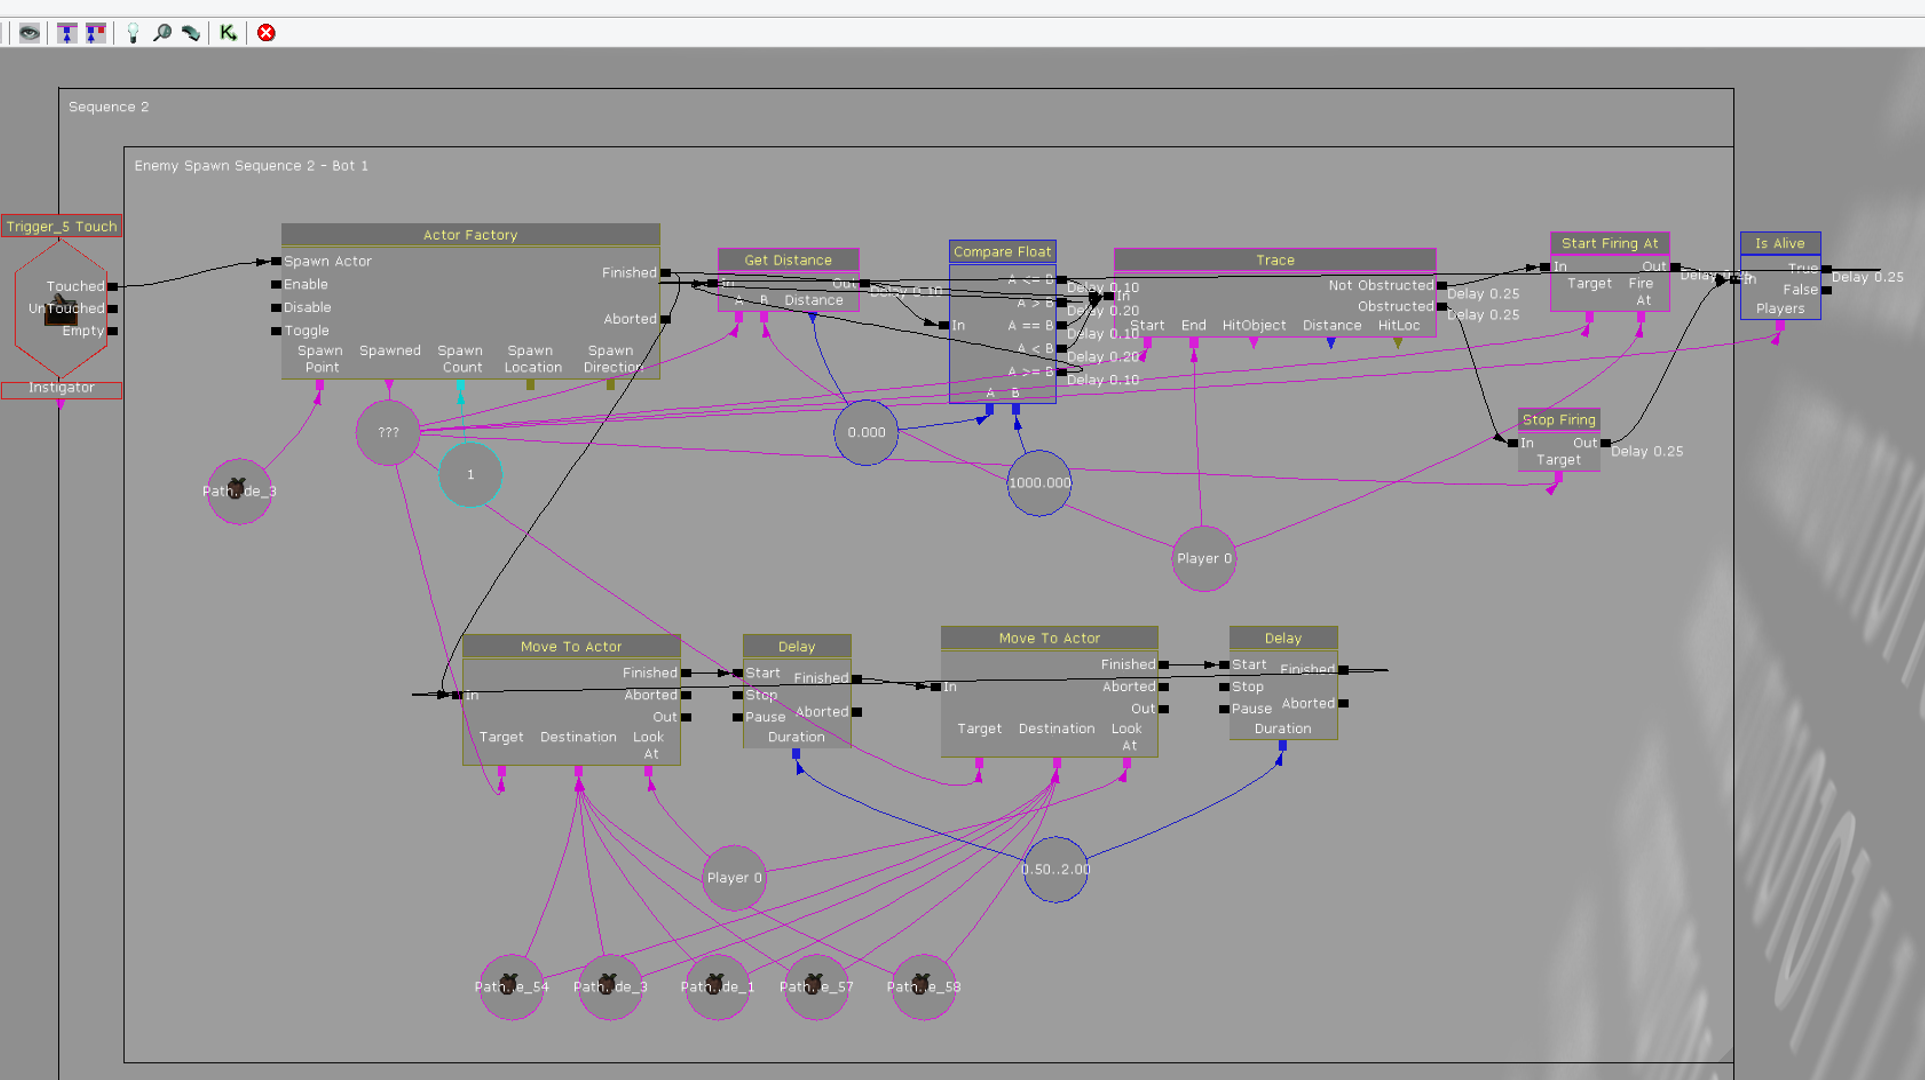
One AI sequence for spawning, moving and governing who to shoot at and when. The gray colored comment boxes keep the order in which AI is spawned organized.
When the player touches a particular trigger, each actor factory attached to that trigger will spawn 1 AI skeletal mesh at a predetermined path node (it doesn’t have to be a path node, but it is what I used). After that, the “finished” output links to two separate nodes: Get Distance and Move to Actor.

Portion governing searching if player avatar is within a specified distance. If so, look at the player avatar and start firing at the player. If not, stop firing.
First, the Get Distance node compares two actors to one another. In this case, it is the AI actor and the player. The Compare Float then sets that distance between 0 and 1000 units. If the player is within 1000 units to the AI, the AI will begin tracing (looking at) the player. If visible, start firing at the player. If not, stop firing. Then, a condition is checked to see if the AI is still alive after the loop. If so, repeat the whole process over again.

Move to Actor sequence. Tells AI actor to move to one path node selected at random, delay, then move to another.
By utilizing the “Move to Actor” node, one actor can be instructed to move to another, then another, and so on. The “target” (the actor we want to move) is assigned to the AI, while the destination includes all of the path nodes we want to allow the AI to move to. Getting away with one “Move to Actor” and “Delay” is doable. I repeated the process twice to ensure it didn’t bug out.
A delay is necessary, not only to ensure that the process doesn’t confuse itself with too many commands at once, but to make the AI movement look more natural. It looks pretty odd to the player if the enemy is just running back and forth from one point to the next all the time.
Final Boss & The Key
Much of the boss’ kismet sequence looks similar to the other AI enemies. However, there are some additions made, on account that a key needed to appear to fall from the enemy when it was defeated.

Sequence for spawning, moving, and telling the boss when to attack. Teleports and attaches the key mesh to boss, and keeps it hidden from the player.
I’ve focused in on the key portions of difference. They consist of binding the the key to the boss and repeatedly check for the fulfillment of Remote Event “Death”.

Sequence to move the key and bind it to the boss

Remote Event that checks if the boss has died.
When the boss dies, the remote event “Death” initiates and executes the sequence depicted below. The Key becomes visible, an announcement is displayed, and the key’s matinee animation plays back.

Remote event “Death” sequence
After the player walks over the key, a Boolean sets the variable “Key” to true. This is critical for getting the cave door to function.

Trigger for picking up the key. Turns “Key” variable to true.
When player approaches the cave door trigger when “Key” is set to true, an announcement plays and a matinee for opening the door plays. If false, a separate announcement plays and the door remains closed.

If the key variable is true when the player touches the trigger in front of the cave, the cave doors will open. If false, the player receives a message that the door is locked.
And that is the functioning of the game in a nutshell! Once again, I’m deeply sorry that I didn’t have pictures to show it functioning in action, but if you’d like to try the final product for yourself click on the following link to access the .exe: https://www.dropbox.com/s/a8j49p40imkh66i/TeamFire_Wk4_Gold_0629.udk
Fun Facts
Originally, we intended the combat to be melee based, rather than using guns. Getting a collision volume to bind to the melee weapon and work against enemies was incredibly difficult, and binding one to enemies was out of the question. Though it broke the theme of the game, we had to use guns in the end, as combat was essential to have in the game to some degree.
The pagoda was pieced together with volume brushes completely within UDK. An alternate software was not utilized.
Getting the AI to stop moving and start firing when they saw the player was extremely difficult to sort out. The process took over a week to iron out.
